


By Ginivir

Video:
Part 1
Part 2
Photos:


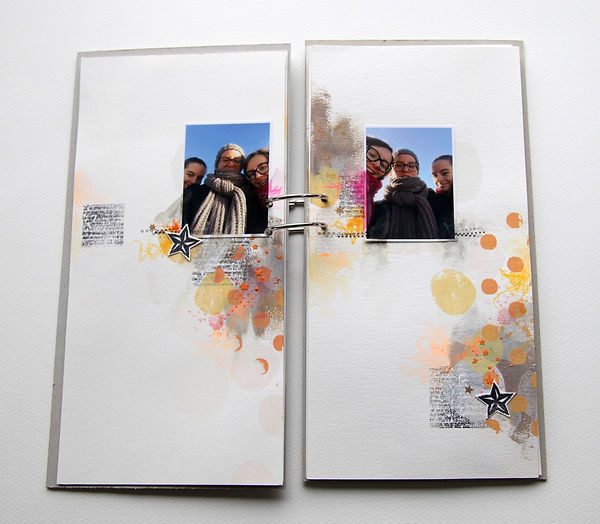


Ginivir’s ‘Hello’ Mini Album
Materials
-
Watercolour paper, 7 sheets cut into rectangles 15 x 30cm
-
Grey cardboard 3mm thick, 2 rectangles 16 x 31cm and some extra for cut-outs
-
1 piece of black cardstock
-
Ink stamps; text for background (Lime Citron), some simple patterns like dots, stars, circles, splashes, (L’encre et L’image)
-
Ink stamps (XO)
-
plain white badge, 45mm (Scrapbuttons)
-
Screen printing frame (Scrapbuttons 100% Artistique), Heidi Swapp art screens, gouache paint: white, light pink, yellow/orange and paint scraper (or an old shopping loyalty card)
-
Stencils and rub on transfers (Kesi’art)
-
Coloured modelling paste (Aladine)
-
Die cutting dies (DIY & Cie)
-
Black ink (Archival Ink), Izink dye ink (Aladine or Ranger Distress)
-
Light pink embossing powder (American Crafts)
-
White gesso
-
Coloured pencils (Ferby)
-
2 metal rings (Binder ring snap open type)
-
Double-sided sticky tape
-
Acrylic paints, watercolour paints
Instructions
Start with your pieces of watercolour paper and some acrylic paint. Use a finger to spread some paint onto one or two areas of each page, layering colours one on top of the other. Use the same combination of colours on each of the pages, on both the fronts and the backs. Dry the paint. The rest of the work you will do on your pages will be anchored on these areas of colour.
Make yourself a temporary stencil from a sheet of paper by cutting out two squares, one 3 x 3cm and the other 4 x 4cm. Find a couple of ink stamps to use on your background, one with fine lines of text and another with dots. Position your improvised stencil and stamp the squares onto your pages, making one or two squares on each page. Dry.
Next screen print all of the pages: first with large circles in matte white paint, then small circles in light pink and light orange, then some small dots or a word with a darker shade of orange. Dry the paint in between applications and make sure that you do all of the pages, front and back. Use some separate sheets of paper to screen print some words in orange that you will be able to use for your title.
You might want to make your own colour and come back and print the pattern a second time, perhaps over the top of the first one but slightly offset, or in a different place.
Take your stamp with the splash shape and print it on your pages using pink and orange paint, again remembering to do both the fronts and backs. Stamp on some slightly larger patterns and emboss them. Why not mix up the colours a bit, perhaps orange dye ink embossed with light pink. Emboss patterns on five of your pages.
At this point you should organise your pages and put them together into the order that you want them.
Take an ink stamp with text on, ink it with orange dye ink and stamp it on some of the pages.
Choose a stencil and use a spatula to spread a small area with some coloured modelling paste. When this is dry, choose another stencil, with a more delicate pattern and spread another colour of modelling paste on another small area, then dry again.
Now position your photos on your pages and stick them down with double-sided sticky tape.
Using watercolours paint the areas around your photos, starting your brushstrokes on the edges of the photos and using paint to pick up the colours in the pictures and elongate them out onto the pages. You could add some touches of fluorescent colour or extend your lines around the circles printed onto your background. Be careful not to get much of your watercolour paint on top of the patterns stamped with dye ink, as they will dilute it. The same goes for the patterns that you have screen printed with gouaches.
You should also use coloured pencils to make some patterns which start on the photos and flow into the pages. Do this on all of your pages. On the page without a photo you should still stamp the same patterns underneath the square block of text that you stamped on with your improvised stencil.
Stamp some stars onto a spare sheet of watercolour paper then cut these out. Use some small single stars and some rows of smaller stars together in a line. Make enough so that you have at least one for each page, as well as the cover, and about three of the strips of the smaller stars. Glue either a star or one of the strips of stars onto each page, including the one without a photo.
Take the rub on transfers and add a gold star to each page, then add a few words or titles. Take care if the paper you are using is quite textured in case the transfers don’t attach well. If you need to you can retouch them by outlining them with a black pen. When you have put on the transfers you can put some touches of watercolour paint on top of them and around them to brighten them up.
Keep the inside pages of the front and back covers blank. Consider where you will want to place the plain badge on your front cover and then put a layer of white gesso in this area. Dry, then add a touch of white if it doesn’t look sufficiently opaque. Use Watercolours to add some paint to the top section of the front cover, using the same colour scheme as you have inside, then dry again.
Stamp on a text motif in orange and some splashes in pink. Take your temporary stencil and make two squares of text then stamp on some little dots and circles.
Glue down the badge. Cut out a word to make the title then glue it onto the cover so that part of it covers some of the badge. Glue on a little star. Use your watercolours to add a little colour to the badge and the star, then dry.
Add some rub on transfers of stars and text. Use a die cutting machine to cut out a small motif in black cardstock and glue it underneath the title.
Decorate the back cover in a similar fashion to the front, but without the gesso and the badge; just use a black square of text, a band of orange text, some watercolour paint, some rub on transfers and a cut-out in black cardstock.
Next bind the pages of your album together with the two metal rings. Line up all of your pages and your covers together, then centre the pages on the covers. Pierce two holes through the album. These will be close to each other in the centre, one 12cm up from the bottom and one 14 cm up. Both should be 1 cm in from the left. Once you have made your holes attach the metal rings and your album is finished.
Tips
-
If you don’t have a screen printing frame you could use individual art screens or get a similar affect with stencils and a large foam paintbrush because screen printing allows you to print patterns with a relatively small quantity of paint, whereas adding patterns with another medium, such as modelling paste can create a thicker more textured layer. You could also work with foam pads, such as Cut N Dry, and inks or paints.
-
If you don’t want to, you don’t have print the whole of the pattern on your screen; you can block of sections with masking tape. You could also mix colours directly on your screen.
Note
When you are screen printing you put your colour on one side and then scrape across the screen, transferring the paint through to the other side. Do not leave a thick layer of gouache on the pattern that you are printing. As you work, keep checking that everything is clean and make sure that your page is dry so that you screen stays clean. When you are finished wash your screens and frame with cold water and a soft sponge. It is easiest to leave your screens to dry draped over the edge of the sink or a washing up bowl. If you get an unwanted ooze or dribble of paint on your work you can remove it with a damp soft sponge, because gouache is water soluble.
I only put one photo on each page, but you might decide to put two or three, depending on what you think looks best.
Mini Hello Ginivir
Matériel
-
Papier aquarelle : 7 rectangles 15x30cm
-
Carton gris 3mm d’épaisseur : 2 rectangles 16x31cm et des chutes
-
Une chute de cardstock noir
-
Tampon de fond texte Lime Citron, motifs simples : pois, ronds, étoiles et taches L’Encre et l’image
-
Tampons « xo », badge blanc 45mm Scrapbuttons
-
Châssis sérigraphie Scrapbuttons 100% artistique, screens Heidi Swapp, gouaches blanc, rose clair, jaune/orange et carte de fidélité
-
Pochoirs et rub-ons Kési’Art
-
Modeling paste colorée Aladine
-
Die DIY & Cie
-
Archival noire, encre dye Izink Aladine ou Distress de chez Ranger
-
Poudre à embosser rose clair American Crafts
-
Gesso blanc
-
Crayons de couleur Ferby
-
2 anneaux brisés
-
Double face
-
Peintures acryliques, aquarelles
Prenez les papiers aquarelle et les peintures acryliques. Avec votre doigt, étalez de la peinture sur une ou deux zones, superposez les couleurs les unes sur les autres. Utilisez le même combo de couleurs sur toutes les pages et faire le recto ET le verso des pages. Séchez. Ces zones vont servir de point de départ pour le travail qui suit.
Fabrication d’un pochoir éphémère : prenez une feuille de brouillon et évidez 2 zones, 1 carré de 3cm de côté et 1 autre carré de 4cm de côté. Prenez un tampon de fond avec du texte et un autre avec des points, l’Archival noire et tamponnez les motifs à travers le pochoir. Créez ainsi 1 ou 2 carrés sur chaque feuille aquarelle.
Sérigraphiez ensuite toutes les pages : d’abord des gros pois en blanc mat, des pois moyens en rose clair puis orange clair et des petits pois ou un mot avec un orange plus soutenu. Séchez entre chaque étapes et faites ainsi toutes les pages recto ET verso. Sérigraphiez aussi sur des chutes de papier, des mots avec du orange qui pourront servir pour faire le titre. N’hésitez pas à faire vous-même votre couleur et à revenir imprimer le motif une seconde fois sur la page juste en jouant sur des décalages ou sur d'autres zones.
Prenez des tampons taches et tamponnez sur les pages en rose et orange, toujours recto ET verso. Séchez puis tamponnez à nouveau des motifs un peu plus gros et embossez à chaud. N’hésitez pas à mélanger les teintes : encre dye orange pour embosser du rose clair ! Cinq pages ont été embossées.
A cette étape, organisez l’ordre de vos pages et leur sens.
Encrez un tampon texte avec une encre dye orange et tamponnez sur quelques pages.
Prenez un premier pochoir et étalez la modeling paste colorée à la spatule à peinture sur une petite zone. Séchez. Prenez un autre pochoir avec un motif très fin, une seconde modeling paste et étalez de la matière sur une petite zone. Séchez.
Reprenez vos pages. Positionnez vos photos et collez-les au double face.
Avec les aquarelles, colorez les pourtours des photos en démarrant sur les photos et en prolongeant les zones colorées. Rajoutez ainsi des touches de fluo, ou faites le tour de certains ronds. Attention à ne pas trop passer sur les motifs tamponnés avec les encres dye car vous risquez de les diluer, idem pour les motifs sérigraphiés à la gouache.
Gribouillez à l'aide des crayons de couleur un petit motif, là-aussi à la fois sur la photo et la page. Jouez sur les couleurs. Vous pouvez faire ces gribouillis sur les zones déjà travaillées avec les aquarelles.
Prenez les tampons en ligne petits pois et petits ronds et tamponnez ce motif à la fois sur la photo et la page. Faites ainsi sur toutes les photos. Sur la page sans photo, tamponnez tout de même le motif sur le bas du carré avec le motif texte.
Sur la chute de papier aquarelle, tamponnez des étoiles à détourer ensuite, ainsi que des lignes d’étoiles fines. Prévoir une étoile par page au moins, plus les couvertures, et 3 bandes d’étoiles. Collez sur chaque page une étoile, ou parfois une bande d’étoiles comme sur la page sans photo.
A l'aide des rub-ons, collez sur chaque page une étoile dorée, puis rajoutez quelques mots ou titres. Attention avec le papier aquarelle qui a du grain, les rub-ons n’accrochent pas très bien. Si il le faut, retouchez les motifs avec un stylo noir. Quand les rub-ons sont posés, remettre une pointe d’aquarelle en passant au dessus si cela est trop clair.
Les couvertures : les 2ème et 3ème de couverture restent neutres.
Sur la 1ère de couverture, positionnez le badge blanc, et blanchir avec du gesso l’endroit où il sera situé. Sécher. Remettre une touche de blanc si ce n’est pas assez opaque.
Avec les aquarelles, colorez le haut de la couverture en restant dans le combo de couleurs visible à l’intérieur. Séchez.
Tamponnez un motif texte en orange, des taches en rose. Reprenez votre pochoir éphémère et le tampon texte et créez 2 carrés de texte. Tamponnez ensuite les petits points et ronds.
Collez le badge. Détourez un mot pour faire le titre et collez-le à la fois sur la couverture et le badge, collez aussi une étoile. Reprenez les aquarelles et colorez légèrement le badge et l’étoile. Séchez.
Ajoutez des rub-ons étoiles et du texte. Découpez avec le die, dans du cardstock noir, un motif fin et collez-le sous le titre.
4ème de couverture : même travail que sur la 1ère de couverture sans le gesso, sans le badge, juste un carré noir de texte, une bande de texte orange, des aquarelles, des rub-ons et une découpe dans du cardstock noir.
Pour la reliure : alignez toutes les pages et couvertures sur la gauche. Centrez les pages sur les couvertures.
Percez un trou à 12cm du haut et 1cm de la gauche et à 14cm du haut et 1cm de la gauche. Reliez le tout avec 2 anneaux brisés.
Astuces :
-
Pas de châssis de sérigraphie ? Optez pour les screens ou alors travail avec des pochoirs et des pinceaux en mousse puisque la sérigraphie permet d’imprimer des motifs avec très peu de matière contrairement au travail avec la modeling paste qui apportera de la texture à votre projet. Vous pouvez aussi travailler avec un cut’n dry des encres ou de la peinture !
-
Vous n’êtes pas obligés d’imprimer tout le motif du châssis ou screen ! Pensez à masquer des éléments avec du scotch de masquage et à mélanger les couleurs directement sur le châssis ou screen.
Rappel :
Pour la sérigraphie, on met la couleur sur un côté et on l’entraine avec la carte de l’autre côté. Ne pas laisser d’épaisseur de gouache sur le motif qui va être imprimé. Vérifiez régulièrement la propreté de votre plan de travail et surtout on travaille sur un papier sec afin que le châssis reste propre. Nettoyez régulièrement les screens et châssis à l’eau froide et avec une éponge douce. Je vous conseille de coller les screens le long de l’évier ou sur les bords d’une bassine, c’est plus facile. Enfin si jamais la peinture bave, vous pouvez « rattraper » la coulure en la lavant avec une éponge douce car la gouache se dilue facilement.
Je n’ai mis qu’une photo par page mais vous pouvez en mettre 2 ou 3.
